How to Build a DevOps Project Step by Step: A Comprehensive Guide for Beginners
How to Build a DevOps Project Step by Step: A Comprehensive Guide for Beginners
Dec 10, 2024
Jithin
Dec 10, 2024


Jithin


Step-by-Step Guide to Building a DevOps Project for Beginners

In today’s world, creating software quickly and efficiently is very important. This is where DevOps comes in. DevOps is a combination of two words: Development (Dev) and Operations (Ops). It helps teams work together to build and deliver software faster and better. In this guide, we will learn how to build a DevOps project step by step. This guide is perfect for beginners, so let’s get started.
What is DevOps?
DevOps is a way of working that brings together software developers and IT operations teams. The main goal of DevOps is to make the software development process faster and more reliable. By working together, teams can create software that meets the needs of users and businesses.
Why is DevOps Important?
DevOps is important for several reasons:
Faster Delivery: DevOps helps teams deliver software more quickly. This means users get new features and updates faster.
Better Collaboration: DevOps encourages teamwork between developers and operations staff. This leads to better communication and fewer misunderstandings.
Higher Quality: With DevOps, teams can test their software more often. This helps catch bugs and problems early, leading to better quality software.
More Efficiency: DevOps uses automation to handle repetitive tasks. This allows developers to focus on more important work.
Step 1: Set Your Project Goals
Before starting your DevOps project step by step, it’s important to set clear goals. What do you want to achieve? Here are some examples of goals you might set:
Reduce Deployment Time: You might want to decrease the time it takes to release new software from 2 hours to 30 minutes.
Increase Deployment Frequency: You could aim to release updates from once a month to once a week.
Step 2: Choose Your Tools
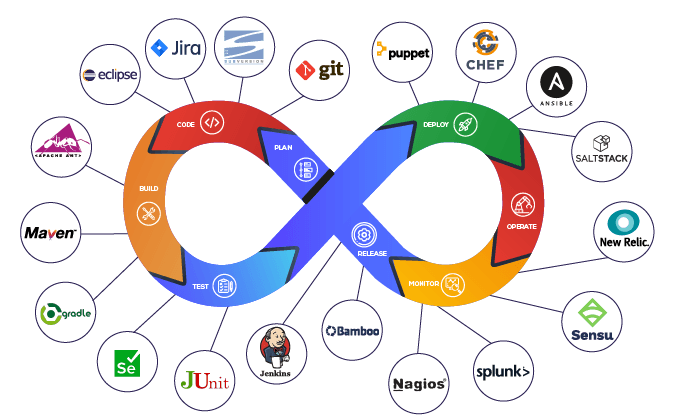
Choosing the right tools is a key part of any DevOps project. Here are some important types of tools you should consider:
Version Control: Tools like Git or GitHub help you manage changes to your code and collaborate with others.
Continuous Integration/Continuous Deployment (CI/CD): Tools like Jenkins or Azure DevOps automate the process of testing and deploying your software.
Configuration Management: Tools like Ansible or Chef help manage the settings and configurations of your servers.
Monitoring and Logging: Tools like Prometheus or Grafana help you keep track of how your application is performing.
Recommended Tool: Azure DevOps
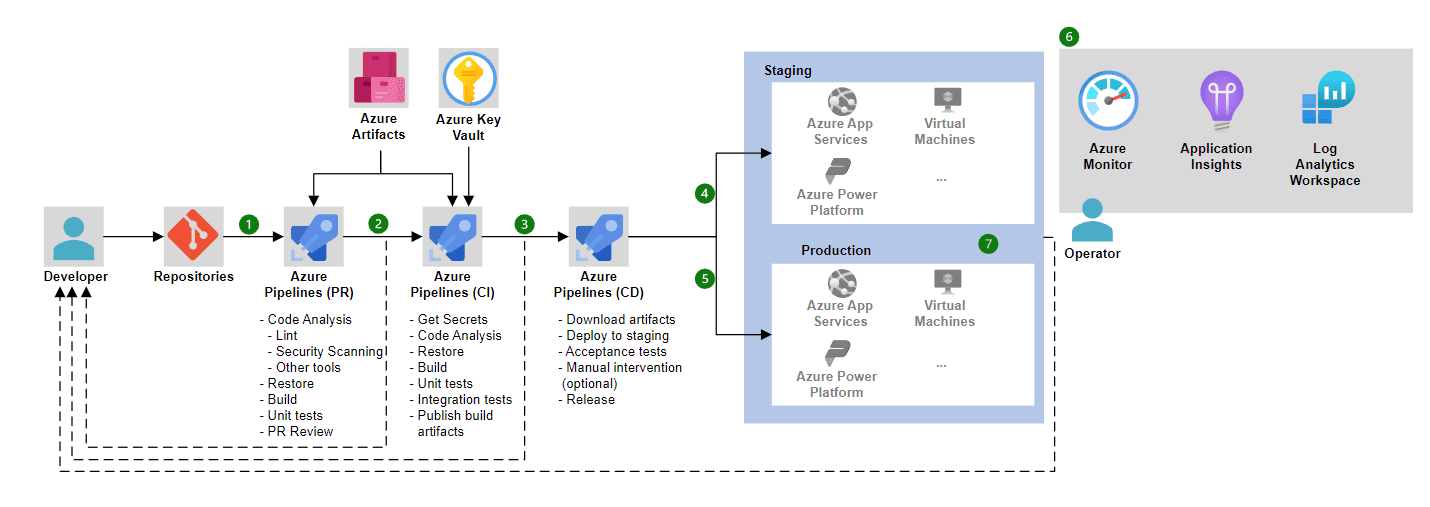
If you want to learn about an Azure DevOps CI CD pipeline step by step, Azure DevOps is a great choice. It provides a complete set of tools to help you manage your development process, from planning to deployment.

Source: Image
Step 3: Set Up Your Development Environment

Now that you have your tools, it’s time to set up your development environment. This includes:
Creating a Repository: Set up a Git repository for your project. This is where you will store your code.
Configuring CI/CD Pipelines: Use Azure DevOps to create a CI/CD pipeline that automates the build, test, and deployment processes.
Setting Up Development and Staging Environments: Create separate environments for development, testing, and production. This ensures that changes are thoroughly tested before going live.
Sample DevOps Project Structure
Here’s a simple structure for a sample DevOps project:
/my-devops-project
|-- /src
| |-- main.py
|-- /tests
| |-- test_main.py
|-- .gitignore
|-- azure-pipelines.yml

Source: Image
Step 4: Implement Continuous Integration
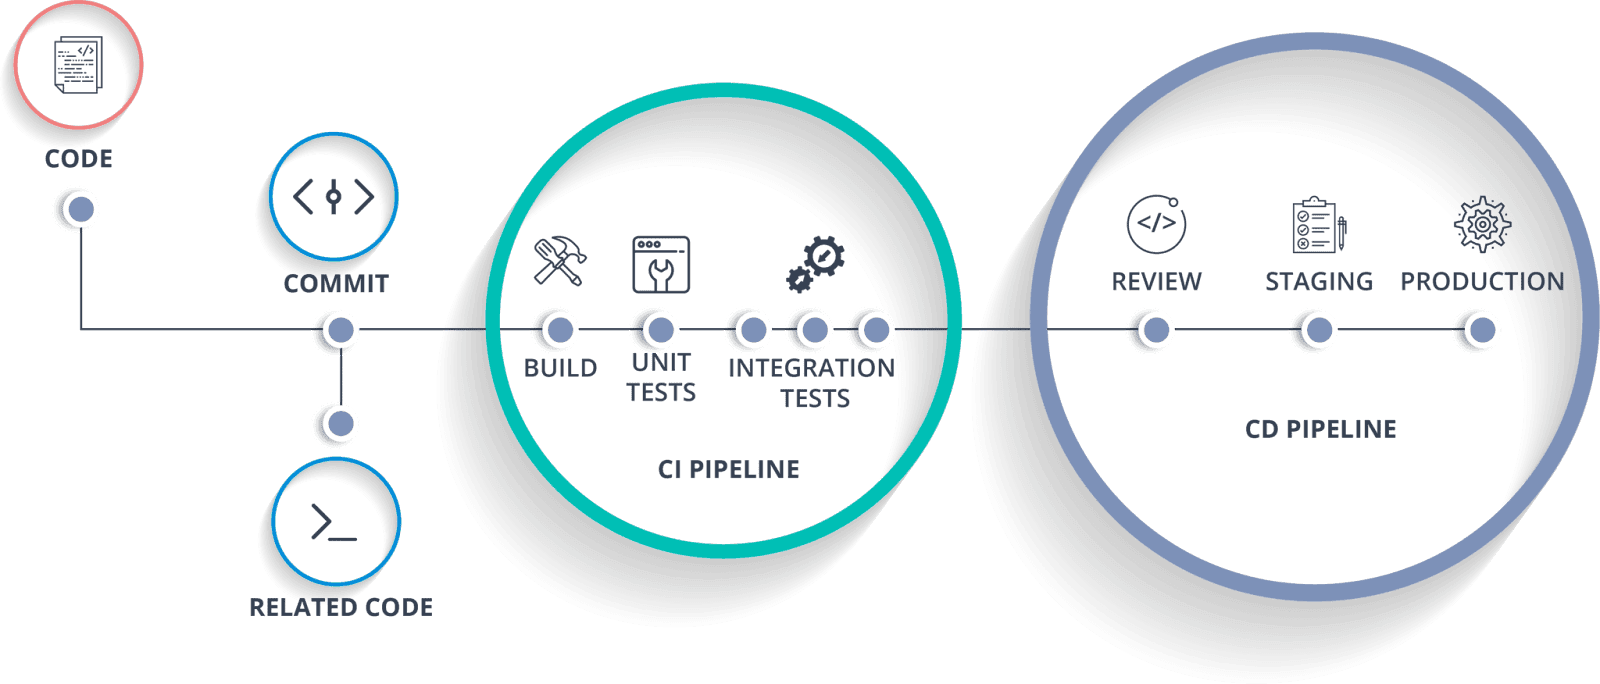
Continuous Integration (CI) is a key practice in DevOps. It means automatically testing and integrating code changes into a shared repository. Here’s how to implement CI:
Write Tests: Create tests for your code to ensure that new changes do not break existing functionality.
Configure CI Pipeline: In Azure DevOps, set up a CI pipeline that triggers on code commits. This pipeline should:
Build the application.
Run tests.
Notify the team of any failures.
Example CI Pipeline Configuration
Here’s a basic example of an Azure DevOps pipeline configuration in YAML:
trigger:
- main
pool:
vmImage: 'ubuntu-latest'
steps:
- script: echo Building the project...
displayName: 'Build Step'
- script: echo Running tests...
displayName: 'Test Step'
Step 5: Implement Continuous Deployment
Once you have a CI pipeline in place, the next step is to implement Continuous Deployment (CD). This practice automates the deployment of code changes to production after passing tests. Here’s how to set it up:
Create a CD Pipeline: In Azure DevOps, create a CD pipeline that triggers after successful CI builds.
Deploy to Staging: First, deploy your application to a staging environment for further testing.
Automate Production Deployment: Once the staging tests pass, automate the deployment to the production environment.
Example CD Pipeline Configuration
Here’s an example of a CD pipeline configuration:
stages:
- stage: Deploy
jobs:
- job: DeployToStaging
steps:
- script: echo Deploying to Staging...
displayName: 'Deploy to Staging'
- job: DeployToProduction
dependsOn: DeployToStaging
steps:
- script: echo Deploying to Production...
displayName: 'Deploy to Production'

Source: Image
Step 6: Monitor and Optimize
Monitoring is a critical part of any DevOps project. It allows you to track how your application is performing and identify issues before they affect users. Here’s how to implement monitoring:
Set Up Monitoring Tools: Use tools like Prometheus or Grafana to monitor application performance and system health.
Log Application Events: Implement logging to capture application events and errors for troubleshooting.
Analyze Metrics: Regularly review performance metrics to identify areas for improvement.
Step 7: Foster a DevOps Culture
Building a successful DevOps project is not just about tools and processes; it’s also about culture. Encourage collaboration and communication among team members by:
Promoting Shared Responsibility: Ensure that both development and operations teams are accountable for the success of the project.
Encouraging Continuous Learning: Provide opportunities for team members to learn new skills and stay updated on industry trends.
Celebrating Successes: Recognize and celebrate team achievements to foster a positive work environment.
Conclusion
Building a DevOps project step by step requires careful planning, the right tools, and a commitment to collaboration and continuous improvement. By following the steps outlined in this guide, you can create a robust DevOps pipeline that enhances your software development process.
Are you ready to take your DevOps skills to the next level? Explore our AWS and DevOps courses designed for beginners and professionals alike. Gain hands-on experience, expert guidance, and the confidence to build scalable DevOps solutions. Enroll now and transform your tech career today!
Step-by-Step Guide to Building a DevOps Project for Beginners

In today’s world, creating software quickly and efficiently is very important. This is where DevOps comes in. DevOps is a combination of two words: Development (Dev) and Operations (Ops). It helps teams work together to build and deliver software faster and better. In this guide, we will learn how to build a DevOps project step by step. This guide is perfect for beginners, so let’s get started.
What is DevOps?
DevOps is a way of working that brings together software developers and IT operations teams. The main goal of DevOps is to make the software development process faster and more reliable. By working together, teams can create software that meets the needs of users and businesses.
Why is DevOps Important?
DevOps is important for several reasons:
Faster Delivery: DevOps helps teams deliver software more quickly. This means users get new features and updates faster.
Better Collaboration: DevOps encourages teamwork between developers and operations staff. This leads to better communication and fewer misunderstandings.
Higher Quality: With DevOps, teams can test their software more often. This helps catch bugs and problems early, leading to better quality software.
More Efficiency: DevOps uses automation to handle repetitive tasks. This allows developers to focus on more important work.
Step 1: Set Your Project Goals
Before starting your DevOps project step by step, it’s important to set clear goals. What do you want to achieve? Here are some examples of goals you might set:
Reduce Deployment Time: You might want to decrease the time it takes to release new software from 2 hours to 30 minutes.
Increase Deployment Frequency: You could aim to release updates from once a month to once a week.
Step 2: Choose Your Tools
Choosing the right tools is a key part of any DevOps project. Here are some important types of tools you should consider:
Version Control: Tools like Git or GitHub help you manage changes to your code and collaborate with others.
Continuous Integration/Continuous Deployment (CI/CD): Tools like Jenkins or Azure DevOps automate the process of testing and deploying your software.
Configuration Management: Tools like Ansible or Chef help manage the settings and configurations of your servers.
Monitoring and Logging: Tools like Prometheus or Grafana help you keep track of how your application is performing.
Recommended Tool: Azure DevOps
If you want to learn about an Azure DevOps CI CD pipeline step by step, Azure DevOps is a great choice. It provides a complete set of tools to help you manage your development process, from planning to deployment.

Source: Image
Step 3: Set Up Your Development Environment

Now that you have your tools, it’s time to set up your development environment. This includes:
Creating a Repository: Set up a Git repository for your project. This is where you will store your code.
Configuring CI/CD Pipelines: Use Azure DevOps to create a CI/CD pipeline that automates the build, test, and deployment processes.
Setting Up Development and Staging Environments: Create separate environments for development, testing, and production. This ensures that changes are thoroughly tested before going live.
Sample DevOps Project Structure
Here’s a simple structure for a sample DevOps project:
/my-devops-project
|-- /src
| |-- main.py
|-- /tests
| |-- test_main.py
|-- .gitignore
|-- azure-pipelines.yml

Source: Image
Step 4: Implement Continuous Integration
Continuous Integration (CI) is a key practice in DevOps. It means automatically testing and integrating code changes into a shared repository. Here’s how to implement CI:
Write Tests: Create tests for your code to ensure that new changes do not break existing functionality.
Configure CI Pipeline: In Azure DevOps, set up a CI pipeline that triggers on code commits. This pipeline should:
Build the application.
Run tests.
Notify the team of any failures.
Example CI Pipeline Configuration
Here’s a basic example of an Azure DevOps pipeline configuration in YAML:
trigger:
- main
pool:
vmImage: 'ubuntu-latest'
steps:
- script: echo Building the project...
displayName: 'Build Step'
- script: echo Running tests...
displayName: 'Test Step'
Step 5: Implement Continuous Deployment
Once you have a CI pipeline in place, the next step is to implement Continuous Deployment (CD). This practice automates the deployment of code changes to production after passing tests. Here’s how to set it up:
Create a CD Pipeline: In Azure DevOps, create a CD pipeline that triggers after successful CI builds.
Deploy to Staging: First, deploy your application to a staging environment for further testing.
Automate Production Deployment: Once the staging tests pass, automate the deployment to the production environment.
Example CD Pipeline Configuration
Here’s an example of a CD pipeline configuration:
stages:
- stage: Deploy
jobs:
- job: DeployToStaging
steps:
- script: echo Deploying to Staging...
displayName: 'Deploy to Staging'
- job: DeployToProduction
dependsOn: DeployToStaging
steps:
- script: echo Deploying to Production...
displayName: 'Deploy to Production'

Source: Image
Step 6: Monitor and Optimize
Monitoring is a critical part of any DevOps project. It allows you to track how your application is performing and identify issues before they affect users. Here’s how to implement monitoring:
Set Up Monitoring Tools: Use tools like Prometheus or Grafana to monitor application performance and system health.
Log Application Events: Implement logging to capture application events and errors for troubleshooting.
Analyze Metrics: Regularly review performance metrics to identify areas for improvement.
Step 7: Foster a DevOps Culture
Building a successful DevOps project is not just about tools and processes; it’s also about culture. Encourage collaboration and communication among team members by:
Promoting Shared Responsibility: Ensure that both development and operations teams are accountable for the success of the project.
Encouraging Continuous Learning: Provide opportunities for team members to learn new skills and stay updated on industry trends.
Celebrating Successes: Recognize and celebrate team achievements to foster a positive work environment.
Conclusion
Building a DevOps project step by step requires careful planning, the right tools, and a commitment to collaboration and continuous improvement. By following the steps outlined in this guide, you can create a robust DevOps pipeline that enhances your software development process.
Are you ready to take your DevOps skills to the next level? Explore our AWS and DevOps courses designed for beginners and professionals alike. Gain hands-on experience, expert guidance, and the confidence to build scalable DevOps solutions. Enroll now and transform your tech career today!
